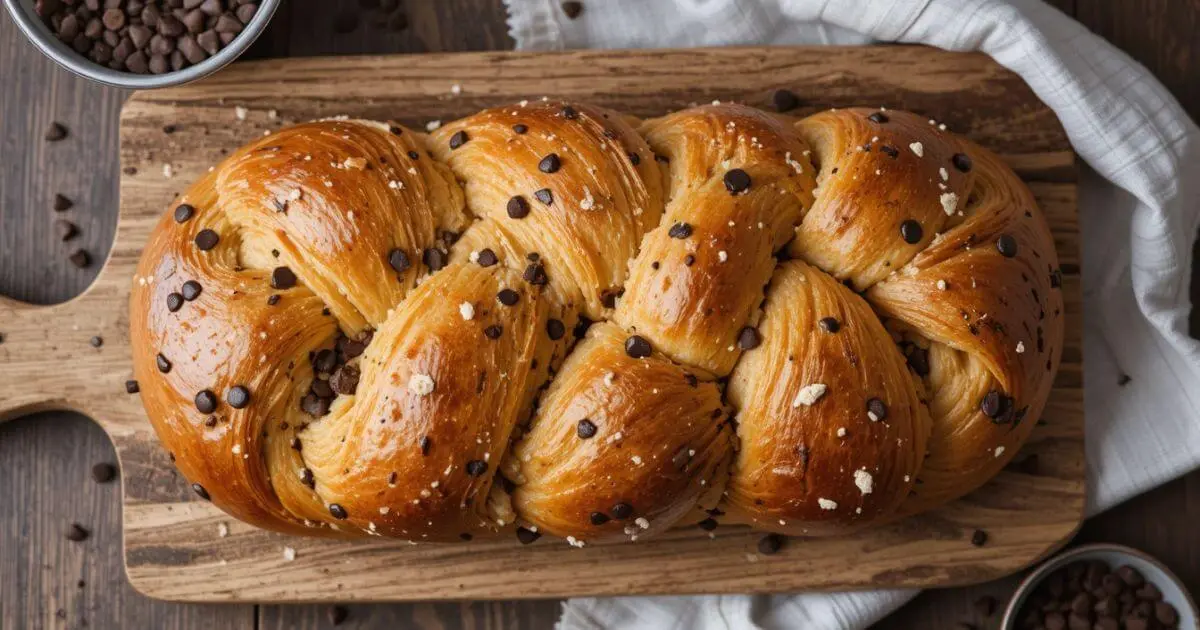
There’s something truly magical about biting into a soft, buttery slice of freshly baked brioche, especially when it’s swirled with rich, melty chocolate chips. If you’ve ever wondered how to make the perfect braided chocolate chip brioche recipe, you’re in the right place. This recipe combines the irresistible flavor of homemade brioche with the delightful sweetness of chocolate, creating a treat that’s perfect for any occasion—whether it’s a cozy breakfast, an afternoon snack, or even a special dessert.
Making brioche from scratch might seem intimidating, but don’t worry—this recipe is approachable, and I’m here to walk you through each step. With a little patience and love, you’ll soon have a beautifully braided loaf that’s just as delicious as it is impressive. So, grab your apron and let’s dive into the art of baking the perfect chocolate chip brioche. Ready to indulge? Let’s get started!
Table of Contents
Why We Love This Recipe
There’s a reason why homemade braided chocolate chip brioche is one of our favorite recipes. It combines the best of both worlds—soft, fluffy brioche and the rich, melt-in-your-mouth goodness of chocolate. Whether you’re looking for the perfect breakfast treat, a decadent snack, or something to impress guests at a gathering, this recipe delivers every time. Let’s dive into why this chocolate chip brioche is such a standout!
1. Buttery, Soft Texture
The true beauty of brioche lies in its texture. Thanks to the combination of butter, eggs, and milk, the dough is luxuriously soft, with a delicate crumb. It’s the kind of bread that melts in your mouth, and when paired with the chocolate chips, it creates an irresistible, indulgent experience. There’s no other bread quite like it!
2. Perfectly Balanced Sweetness
Unlike overly sweet pastries, this brioche strikes the perfect balance. It’s slightly sweet, but not overwhelming, which makes it versatile enough for any occasion. Whether you enjoy it as a breakfast pastry, a dessert, or a snack, the slight sweetness complements the richness of the chocolate without taking over the entire flavor profile.
3. Chocolate Chip Delight
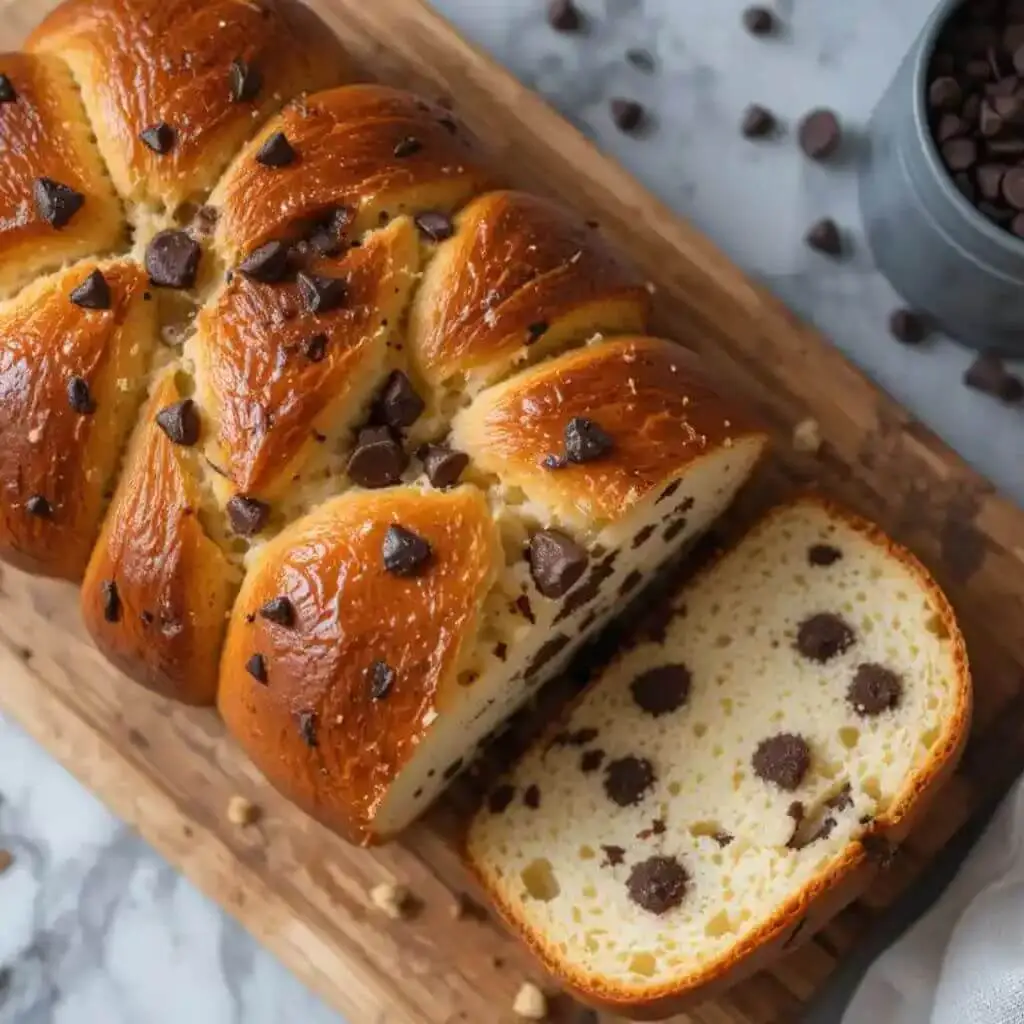
Who doesn’t love chocolate chips? As they bake into the brioche, they create pockets of gooey, melty chocolate throughout the loaf. The chocolate chips add just the right amount of sweetness and richness, without overpowering the light, buttery dough. Every bite is like a little bite of heaven.
4. Impressive Yet Easy to Make
While this recipe may seem impressive when you pull out a beautifully braided loaf, it’s surprisingly easy to make! The braided technique might look complicated, but once you get the hang of it, it’s a breeze. Plus, with a little patience during the proofing stages, you’ll end up with a bakery-worthy treat that’s perfect for any special occasion or family breakfast.
5. Versatile for Any Time of Day
This braided chocolate chip brioche isn’t just for special occasions—it’s the kind of recipe that can be enjoyed at any time of day. Serve it warm with your morning coffee, pack it for an afternoon snack, or treat yourself to a sweet indulgence after dinner. It’s a versatile option that’s sure to become a favorite in your baking repertoire.
6. Ideal for Sharing
There’s something about a freshly baked loaf that brings people together. The act of slicing into this soft, braided chocolate chip brioche and sharing it with loved ones makes it even more special. Whether you’re hosting a brunch, a holiday get-together, or simply enjoying a quiet moment at home, this recipe is a crowd-pleaser. The beautiful braid makes it a stunning centerpiece on any table.
In short, this braided chocolate chip brioche recipe is everything you could want in a sweet, homemade bread: soft, buttery, slightly sweet, and full of chocolatey goodness. It’s the perfect treat for any occasion and is sure to make everyone smile with every bite. Ready to try it out? I promise it’s just as fun to make as it is to eat!
Ingredients
When it comes to making the perfect braided chocolate chip brioche, the ingredients you choose are key to achieving that soft, buttery texture and rich, chocolatey flavor. Don’t worry—these ingredients are simple, and most of them are staples you likely already have in your kitchen. Let’s take a look at what you’ll need:
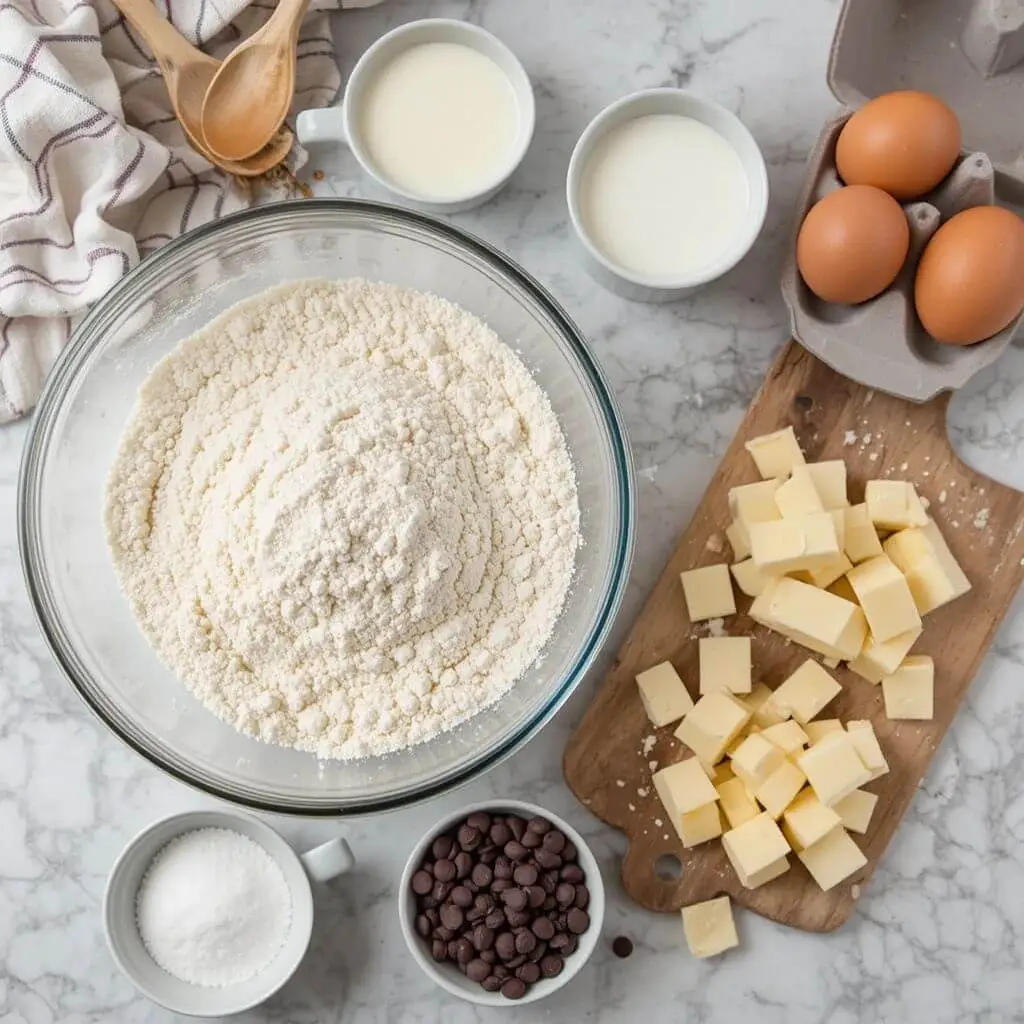
Dry Ingredients:
- 3 cups all-purpose flour: The foundation of your brioche dough. Make sure to measure your flour correctly by spooning it into the measuring cup and leveling it off for accuracy. This helps prevent the dough from becoming too dense.
- 1/4 cup sugar: This will give the brioche just the right amount of sweetness, balancing perfectly with the chocolate chips.
- 1 tsp salt: Salt enhances the flavor of the brioche, helping to bring out the richness of the butter and chocolate.
Wet Ingredients:
- 1/2 cup warm milk (about 110°F): Milk is essential for a soft, rich dough. The warmth helps activate the yeast, so make sure it’s not too hot or too cold—just warm enough to encourage a good rise.
- 3 large eggs: Eggs add structure and richness to the dough. You’ll need them at room temperature to help them incorporate smoothly into the mixture.
Yeast:
- 1 packet (2 1/4 tsp) active dry yeast: Yeast is the star of the show in making your brioche rise. Make sure your yeast is fresh! If it’s expired, it may not activate properly, leaving your dough flat.
Fat & Flavor:
- 1/2 cup unsalted butter (room temperature): Brioche is known for its richness, and butter plays a huge role in giving it that melt-in-your-mouth softness. Let it come to room temperature so it blends easily into the dough.
Chocolate:
- 1 cup chocolate chips (semi-sweet or dark): This is the fun part! The chocolate chips will melt into the dough as it bakes, creating pockets of gooey, melty chocolate. You can use semi-sweet, dark, or even milk chocolate, depending on your preference.
These ingredients work together to create a light, buttery bread with pockets of rich chocolate. The beauty of this recipe is that it uses everyday pantry staples but still feels special, making it perfect for any occasion. Ready to get started? Gather these ingredients, and we’ll move on to the fun part—making your delicious braided chocolate chip brioche!
How to Make Brioche Bread with Chocolate Chips
Making brioche from scratch is a rewarding experience, and when you add chocolate chips, it becomes an irresistible treat. If you’ve never made brioche before, don’t worry! I’ll guide you through the steps to ensure it’s a success. The process is simple and fun, and soon you’ll have a beautifully braided loaf that’s perfect for any occasion.
Step 1: Activate the Yeast
The first step is to activate your yeast. This is crucial for getting that perfect rise in your dough.
- In a small bowl, combine 1/4 cup warm milk (around 110°F) with 1 packet of active dry yeast and a pinch of sugar.
- Stir gently and allow it to settle for 5 minutes. If it’s working, the mixture will become frothy and bubbly.
Pro Tip: If the yeast doesn’t bubble or foam, it might be expired. You’ll need fresh yeast for the best results.
Step 2: Mix Dry Ingredients
In a separate large bowl, combine the dry ingredients. These will help give your dough structure and flavor.
- Add 3 cups all-purpose flour, 1/4 cup sugar, and 1 teaspoon salt.
- Stir them together until they’re evenly distributed.
The sugar and salt help to balance the sweetness of the brioche and enhance the overall flavor.
Step 3: Combine Wet and Dry Ingredients
Now it’s time to bring everything together.
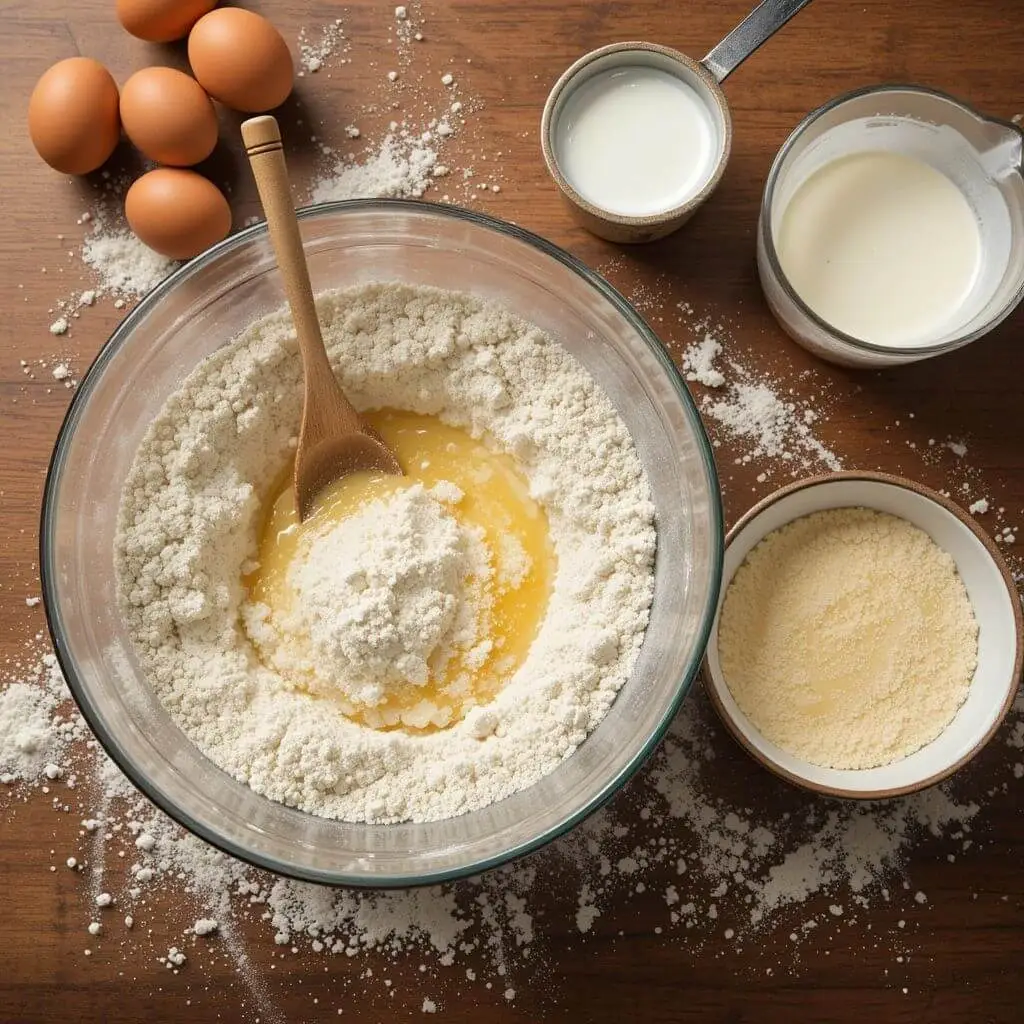
- Make a well in the center of your dry ingredients and pour in the activated yeast mixture along with 2 more large eggs and 1/2 cup warm milk.
- Mix until the dough begins to come together. It will be sticky at first, but that’s totally normal.
Tip: You can use a wooden spoon or your hands to mix, but if you have a stand mixer, this is the time to use the dough hook.
Step 4: Knead the Dough
Kneading is the key to achieving that soft, airy texture in your brioche.
- Shape the dough onto a surface sprinkled with flour. Knead for about 10 minutes, until the dough is smooth, elastic, and a little bit tacky but not sticky.
- If you’re using a stand mixer, knead with the dough hook on low speed for about 8 minutes.
Pro Tip: If the dough is too sticky, sprinkle a little more flour, but don’t add too much—too much flour can make the dough dense.
Step 5: Add the Butter
Brioche is all about that rich, buttery flavor. Now it’s time to incorporate the butter.
- Cut 1/2 cup unsalted butter into small cubes and gradually add them to the dough, one cube at a time.
- Knead the dough until all the butter is fully incorporated. It might seem like the dough is falling apart at first, but don’t worry—it will come together beautifully.
Tip: The butter should be at room temperature to blend smoothly into the dough.
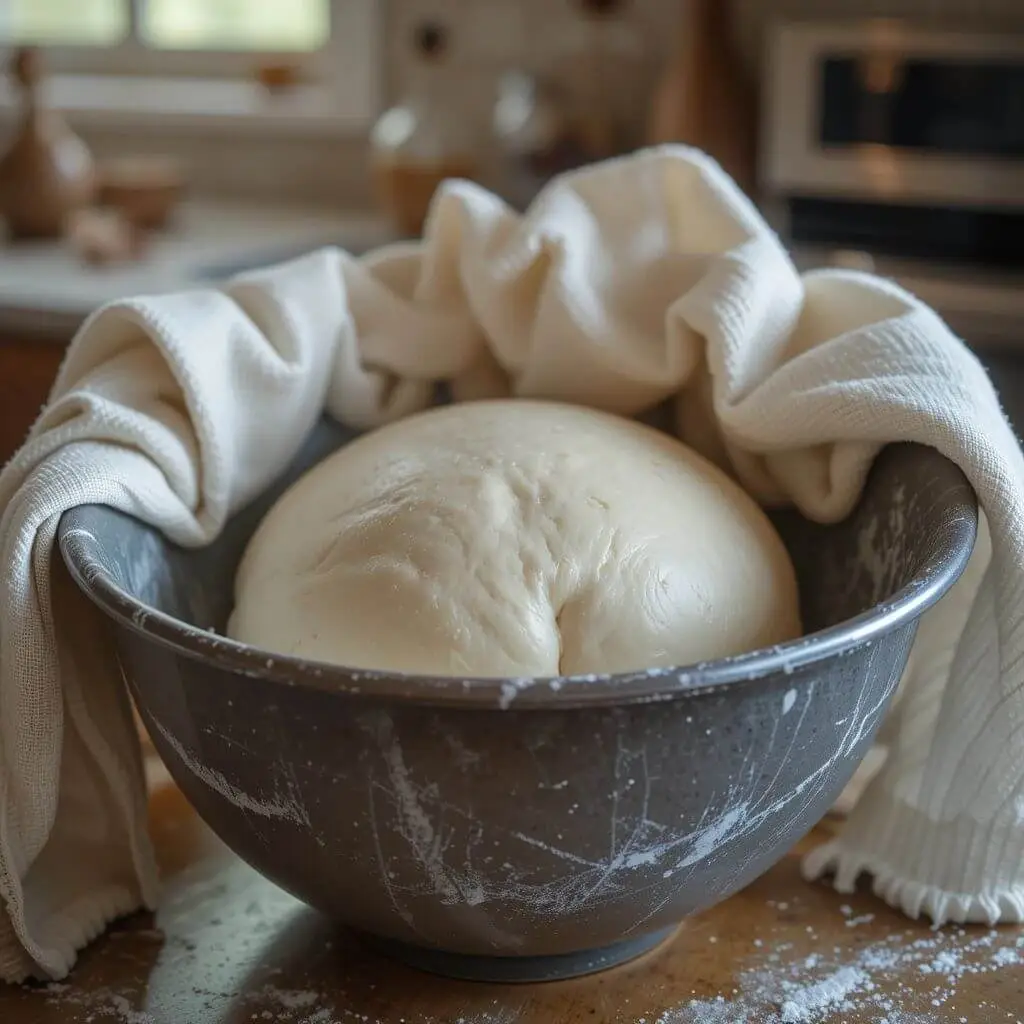
Step 6: First Rise
Now, let’s give the dough time to rise.
- Place the dough in a lightly oiled bowl and cover it with a kitchen towel or plastic wrap.
- Let the dough rest in a warm area for 1 to 1.5 hours, or until it doubles in volume.
Pro Tip: If you’re in a hurry, place the dough in a slightly warmed oven (around 100°F). Just be sure it’s not too hot—yeast doesn’t like high heat!
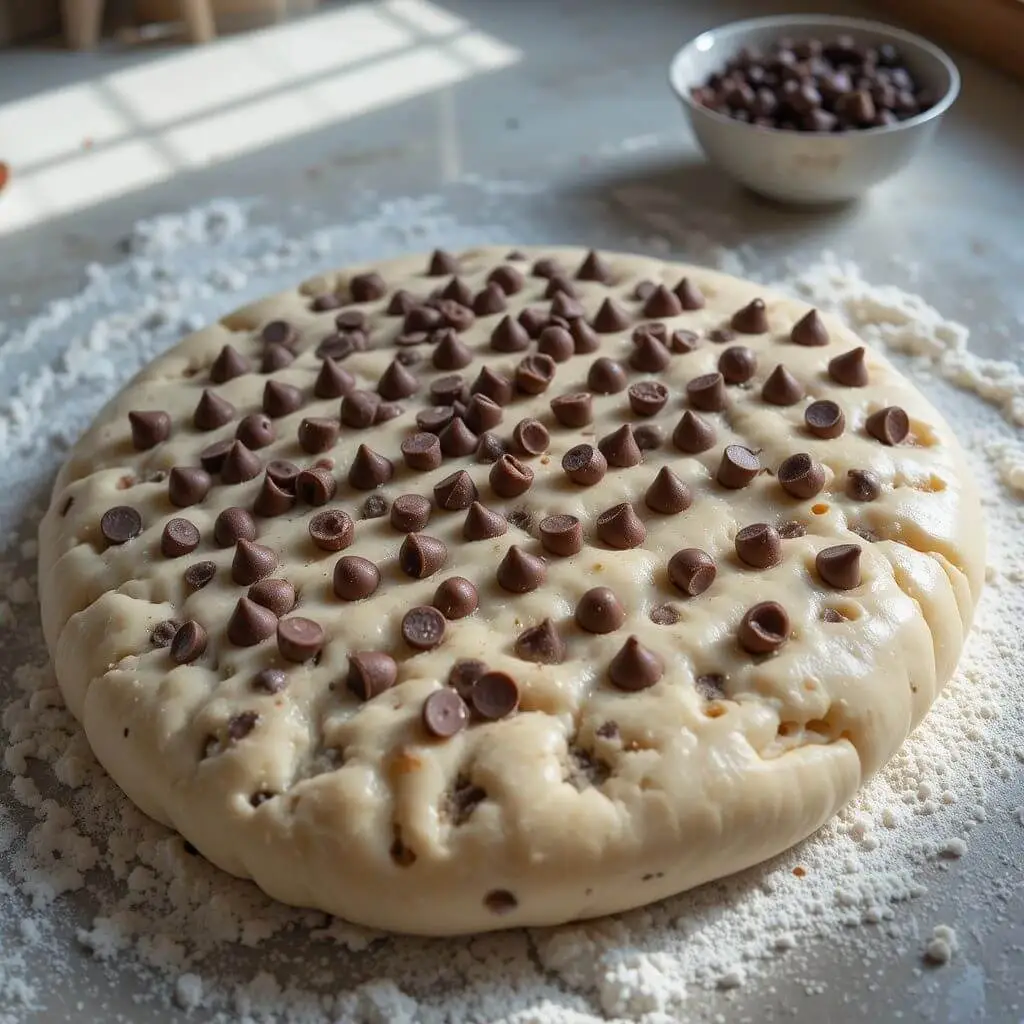
Step 7: Punch Down and Add Chocolate Chips
After the dough has risen, it’s time to punch it down and get ready for the chocolate chips.
- Gently punch the dough to release any air bubbles, then turn it out onto a floured surface.
- Fold in 1 cup of chocolate chips. You can use dark, semi-sweet, or even milk chocolate—whatever suits your taste!
Step 8: Shape the Dough
Here’s where the magic happens: shaping the dough into a beautiful braid.
- Divide the dough into three equal pieces. Roll each piece into a long strand (about 12 inches).
- Pinch the ends together and braid the three strands, securing the ends tightly so they don’t come apart during baking.
Pro Tip: If you’re new to braiding dough, don’t worry if it’s not perfect! The flavor is what counts, and it’ll still look beautiful once it bakes.
Step 9: Second Rise
Before baking, your dough needs a final rise.
- Place the braided dough onto a parchment-lined baking sheet and cover it with a towel.
- Let it rise for 30-45 minutes, or until it has become puffed up.
Step 10: Bake to Perfection
Now it’s time to bake your brioche to golden, chocolatey perfection.
- Preheat the oven to 350°F.
- Brush the top of the braided dough with a beaten egg to give it a shiny, golden finish.
- Bake for 25-30 minutes, or until the brioche is golden brown and sounds hollow when tapped on the bottom.
Tip: If the top of the brioche is browning too quickly, cover it loosely with aluminum foil during the last 10 minutes of baking.
Step 11: Let It Cool and Enjoy
Once the brioche is out of the oven, let it cool on a wire rack for at least 15 minutes before slicing. The chocolate chips will be gooey, so give it a little time to set.
Slice, serve, and enjoy this warm, chocolatey treat!
Making brioche bread with chocolate chips is a rewarding process, and with these clear steps, you’ll be enjoying a delicious loaf in no time. From the soft dough to the chocolatey pockets, this recipe is sure to become a favorite in your baking collection. Enjoy every bite!
Recipe Tips & Troubleshooting
Baking brioche can feel like an art, but with the right tips and a little patience, you’ll be able to create the most decadent braided chocolate chip brioche every time. To help you avoid any bumps along the way, here are some helpful tips and troubleshooting advice to ensure your brioche turns out perfectly.
1. Get Your Yeast Right
Yeast is the heart of your brioche dough, so it’s important to make sure it’s fresh and activated properly.
- Tip: Always use warm, not hot, milk (around 110°F) to activate the yeast. Too hot, and it can kill the yeast. Too cold, and it won’t activate properly.
- Troubleshooting: If your yeast doesn’t foam after 5 minutes, it might be expired. Try using a fresh packet to guarantee a good rise.
2. Don’t Rush the Kneading
Brioche dough requires a good amount of kneading to get the right texture. If you’re using a stand mixer, let the dough hook work its magic. If you’re kneading by hand, it’s essential to be patient.
- Tip: Knead the dough for at least 10 minutes until it’s smooth and elastic. The dough should be soft, but not too sticky. If it’s too sticky, add just a little more flour—carefully!
- Troubleshooting: If your dough feels tough or overly sticky, you might need to knead longer or add a little more flour. Brioche dough should be soft, but with a little bit of a “tacky” feel.
3. Be Patient with the Rising Time
The secret to a light and fluffy brioche lies in allowing it to rise properly.
- Tip: Don’t rush the rise. Let your dough rest and double in size during both rises. If you’re in a warm kitchen, the first rise will take about 1 to 1.5 hours. In cooler rooms, it might take longer, so be patient.
- Troubleshooting: If your dough hasn’t risen in the time specified, try moving it to a warmer area, like an oven that’s been preheated for a few minutes and then turned off.
4. Adding Chocolate Chips
The chocolate chips are the star of this recipe, but they can also be a bit tricky. You don’t want them to sink to the bottom of your loaf, and you want them evenly distributed.
- Tip: Gently fold the chocolate chips into the dough after the first rise, making sure they’re evenly incorporated. You can use dark, semi-sweet, or even milk chocolate chips, depending on your preference.
- Troubleshooting: If the chocolate chips start to melt into the dough, it’s likely because the dough was too warm. Let the dough cool down a bit before adding the chips to avoid any melty mess.
5. Perfecting the Braid
The braided shape adds a beautiful touch to your brioche loaf, but it can be tricky if you’re not used to it.
- Tip: Divide the dough into 3 equal pieces and roll them into long strands, making sure they’re uniform in size. Braid them gently but firmly, and make sure to pinch the ends so they stay together while baking.
- Troubleshooting: If your braid doesn’t look perfect, don’t worry! The beauty of brioche is that it’s forgiving. It will still bake up beautifully, and the chocolate will make it taste amazing no matter the shape.
6. Baking Tips for a Golden Loaf
Achieving that golden-brown, glossy finish on your brioche is all about timing and temperature.
- Tip: Brush the top of your loaf with a beaten egg before baking. This gives the brioche a beautiful golden sheen once it’s out of the oven.
- Troubleshooting: If your brioche is getting too dark on top but isn’t fully baked inside, loosely cover it with aluminum foil for the last 10 minutes of baking. This will allow the inside to cook without over-browning the top.
7. Let It Cool Before Slicing
It can be tempting to dive right in as soon as your brioche comes out of the oven, but patience is key.
- Tip: Let your brioche cool on a wire rack for at least 15 minutes before slicing. This helps the chocolate chips set and prevents the dough from becoming too gooey.
8. Storing Leftovers
If you’re lucky enough to have leftovers (or you want to save some for later), storing brioche properly is essential to keeping it fresh.
- Tip: Store your brioche in an airtight container or wrap it in plastic wrap. It will stay fresh for up to 3 days at room temperature, or you can freeze it for up to 3 months.
- Troubleshooting: If your brioche starts to dry out, try lightly reheating it in the microwave for a few seconds to restore its softness.
Storing & Freezing
Once your braided chocolate chip brioche is baked to golden perfection, you’ll want to enjoy it at its best, and knowing how to store and freeze it properly will help preserve its freshness. Brioche is a delicate, buttery bread, but with the right storage techniques, it can stay delicious for days—or even longer if you decide to freeze it for later!
Storing Brioche at Room Temperature
If you plan to enjoy your brioche within the next few days, the best option is to store it at room temperature.
- Tip: Allow your brioche to cool completely before storing it to avoid condensation that could make it soggy.
- How to Store: Place your cooled brioche in an airtight container or wrap it tightly in plastic wrap. You can also use a resealable plastic bag to keep the air out.
- Shelf Life: Brioche will stay fresh for up to 3 days at room temperature. After that, it may begin to dry out, though it will still be delicious with a quick reheat.
Reheating Brioche
If your brioche is a bit on the stale side or you simply want to warm it up for a cozy snack, reheating is easy!
- Tip: To refresh the texture, simply wrap the brioche in foil and place it in a 350°F oven for 10-15 minutes. This will help restore its softness and make it as good as new.
- Microwave Option: If you’re in a rush, microwave individual slices for 10-15 seconds. The chocolate chips will melt, making it feel just like fresh-baked!
Freezing Brioche for Later
If you’ve made a large batch or just want to save some for a rainy day, freezing brioche is a great way to preserve it without losing its delicious flavor and texture.
- How to Freeze: To freeze, first let your brioche cool completely. Once cooled, wrap it tightly in plastic wrap, followed by aluminum foil for extra protection. You can also freeze individual slices, so you can take out just what you need later.
- Freezing Tip: For added freshness, slice the brioche before freezing. This way, you can easily grab a slice or two without having to defrost the entire loaf.
- Storage Time: Properly wrapped, your brioche can stay fresh in the freezer for up to 3 months.
Thawing and Refreshing Frozen Brioche
When you’re ready to enjoy your frozen brioche, there are two easy ways to thaw and enjoy it:
- Thaw at Room Temperature: Simply remove the brioche from the freezer and let it thaw at room temperature for 2-3 hours. If you’ve frozen slices, they’ll thaw more quickly, usually within 30 minutes.
- Quick Reheat: If you’re short on time, you can reheat frozen brioche directly in the oven. Preheat your oven to 350°F and bake for 15-20 minutes, or until warm through.
Storing Leftover Chocolate Chips
If you end up with leftover chocolate chips after making your brioche, don’t worry! They can be stored just as easily.
- Tip: Store your leftover chocolate chips in an airtight container in a cool, dry place. They will last for up to 6 months at room temperature. You can also freeze chocolate chips for even longer storage.
Whether you plan to eat it right away or savor it later, proper storage is key to keeping your braided chocolate chip brioche as fresh and delicious as the day it was baked. Follow these tips to ensure your brioche stays soft, buttery, and irresistible for days—or even months—to come!
Conclusion
There’s something truly special about homemade brioche, and when you add chocolate chips to the mix, it becomes a luxurious treat that’s both comforting and indulgent. Whether you’re enjoying it fresh out of the oven, sharing it with friends, or saving some for later, this braided chocolate chip brioche is sure to impress.
With its soft, buttery texture and pockets of melty chocolate, it’s a versatile recipe you can enjoy for breakfast, brunch, or even dessert. Plus, once you master the art of making brioche, you’ll be able to experiment with different fillings and flavors to make it your own.
Key Takeaways:
- Patience is key: Allow the dough time to rise and develop its rich texture.
- Butter is your friend: Don’t skimp on the butter—it’s what makes brioche so wonderfully soft and indulgent.
- Enjoy fresh or freeze for later: Whether you finish it in one sitting or save some for a future treat, this brioche stays fresh and delicious when stored correctly.
I hope you enjoy making this delicious braided chocolate chip brioche as much as I do. The process is simple, but the result is nothing short of impressive. Grab your ingredients, follow the steps, and before you know it, you’ll have a beautiful, golden loaf filled with rich chocolate goodness!
Happy baking, and don’t forget to share your results—there’s nothing better than enjoying good food with great company!
—————————————

Braided Chocolate Chip Brioche Recipe
Ingredients
- 3 cups all-purpose flour
- 1/4 cup sugar
- 1 tsp salt
- 1/2 cup warm milk
- 3 large eggs
- 1 packet active dry yeast
- 1/2 cup unsalted butter room temperature
- 1 cup chocolate chips semi-sweet or dark
Instructions
Step 1: Activate the Yeast
- The first step is to activate your yeast. This is crucial for getting that perfect rise in your dough.
- In a small bowl, combine 1/4 cup warm milk (around 110°F) with 1 packet of active dry yeast and a pinch of sugar.
- Stir it gently and let it sit for 5 minutes. If it’s working, the mixture will become frothy and bubbly.
- Pro Tip: If the yeast doesn’t bubble or foam, it might be expired. You’ll need fresh yeast for the best results.
Step 2: Mix Dry Ingredients
- In a separate large bowl, combine the dry ingredients. These will help give your dough structure and flavor.
- Add 3 cups all-purpose flour, 1/4 cup sugar, and 1 teaspoon salt.
- Stir them together until they’re evenly distributed.
- The sugar and salt help to balance the sweetness of the brioche and enhance the overall flavor.
Step 3: Combine Wet and Dry Ingredients
- Now it’s time to bring everything together.
- Make a well in the center of your dry ingredients and pour in the activated yeast mixture along with 2 more large eggs and 1/2 cup warm milk.
- Mix until the dough begins to come together. It will be sticky at first, but that’s totally normal.
- Tip: You can use a wooden spoon or your hands to mix, but if you have a stand mixer, this is the time to use the dough hook.
Step 4: Knead the Dough
- Kneading is the key to achieving that soft, airy texture in your brioche.
- Turn the dough out onto a lightly floured surface. Knead for about 10 minutes, until the dough is smooth, elastic, and a little bit tacky but not sticky.
- If you’re using a stand mixer, knead with the dough hook on low speed for about 8 minutes.
- Pro Tip: If the dough is too sticky, sprinkle a little more flour, but don’t add too much—too much flour can make the dough dense.
Step 5: Add the Butter
- Brioche is all about that rich, buttery flavor. Now it’s time to incorporate the butter.
- Cut 1/2 cup unsalted butter into small cubes and gradually add them to the dough, one cube at a time.
- Knead the dough until all the butter is fully incorporated. It might seem like the dough is falling apart at first, but don’t worry—it will come together beautifully.
- Tip: The butter should be at room temperature to blend smoothly into the dough.
Step 6: First Rise
- Now, let’s give the dough time to rise.
- Place the dough in a lightly greased bowl, covering it with a clean kitchen towel or plastic wrap.
- Let it rise in a warm place for about 1 to 1.5 hours or until it doubles in size.
- Pro Tip: If you’re in a hurry, place the dough in a slightly warmed oven (around 100°F). Just be sure it’s not too hot—yeast doesn’t like high heat!
Step 7: Punch Down and Add Chocolate Chips
- After the dough has risen, it’s time to punch it down and get ready for the chocolate chips.
- Gently punch the dough to release any air bubbles, then turn it out onto a floured surface.
- Fold in 1 cup of chocolate chips. You can use dark, semi-sweet, or even milk chocolate—whatever suits your taste!
Step 8: Shape the Dough
- Here’s where the magic happens: shaping the dough into a beautiful braid.
- Divide the dough into three equal pieces. Roll each piece into a long strand (about 12 inches).
- Pinch the ends together and braid the three strands, securing the ends tightly so they don’t come apart during baking.
- Pro Tip: If you’re new to braiding dough, don’t worry if it’s not perfect! The flavor is what counts, and it’ll still look beautiful once it bakes.
Step 9: Second Rise
- Before baking, your dough needs a final rise.
- Place the braided dough onto a parchment-lined baking sheet and cover it with a towel.
- Let it rise for 30-45 minutes, or until it has puffed up.
Step 10: Bake to Perfection
- Now it’s time to bake your brioche to golden, chocolatey perfection.
- Preheat the oven to 350°F.
- Brush the top of the braided dough with a beaten egg to give it a shiny, golden finish.
- Bake for 25-30 minutes, or until the brioche is golden brown and sounds hollow when tapped on the bottom.
- Tip: If the top of the brioche is browning too quickly, cover it loosely with aluminum foil during the last 10 minutes of baking.
Step 11: Let It Cool and Enjoy
- Once the brioche is out of the oven, let it cool on a wire rack for at least 15 minutes before slicing. The chocolate chips will be gooey, so give it a little time to set.
- Slice, serve, and enjoy this warm, chocolatey treat!
Notes
Nutrition Information (Per Serving)
- Fat: 13g
- Saturated Fat: 8g
- Trans Fat: 0g
- Cholesterol: 40mg
- Sodium: 210mg
- Carbohydrates: 32g
- Fiber: 1g
- Sugars: 14g
- Protein: 3g
- Calcium: 30mg
- Iron: 2mg
- Vitamin A: 180 IU
Recipe FAQs
Making the perfect braided chocolate chip brioche can feel like a challenge, especially if you’re new to baking. But don’t worry! Here are answers to some of the most common questions to help you along the way. Whether you’re wondering about ingredient substitutions or the best way to store your brioche, I’ve got you covered.
Can I use active dry yeast instead of instant yeast?
Yes, you can! If you’re using active dry yeast, you’ll need to activate it first by dissolving it in warm milk or water. Allow it to sit for 5-10 minutes until it’s frothy. Instant yeast doesn’t need this step, as it can be mixed directly with the dry ingredients. Either option will work, but instant yeast is a little more foolproof if you’re looking for ease.
Can I make this recipe without chocolate chips?
Absolutely! While the chocolate chips are the star of this recipe, you can omit them if you prefer a classic brioche loaf. You can also get creative with other mix-ins, such as dried fruit, nuts, or even a swirl of cinnamon sugar. Brioche is versatile and can be adapted to suit your taste.
Can I use whole wheat flour instead of all-purpose flour?
You can, but keep in mind that using whole wheat flour will result in a denser brioche. If you want a lighter, fluffier loaf, I recommend sticking with all-purpose flour. If you’d like to add a bit of whole wheat flavor, try substituting up to 25% of the flour with whole wheat flour and keeping the rest all-purpose.
Can I freeze this brioche dough before baking?
Yes, you can freeze the dough before baking! After the first rise, shape the dough into a loaf or braid, then wrap it tightly in plastic wrap and aluminum foil. When you’re ready to bake, let it thaw in the fridge overnight and give it the second rise at room temperature before baking as usual. This is a great way to prep ahead and enjoy fresh brioche without all the work on baking day.
Why is my brioche dough so sticky?
Brioche dough can be sticky, and that’s perfectly normal because it’s rich in butter and eggs. However, if it’s too sticky to handle, you can sprinkle a little flour on your work surface or add just a touch more flour to the dough. Be careful not to add too much, as this can make the dough too stiff. The key is to knead it until smooth and elastic, which may take a little time and patience.
How do I know when my brioche is fully baked?
To test if your brioche is done, gently tap the bottom of the loaf. If it sounds hollow, it’s ready to come out of the oven. Another method is to use a thermometer—your brioche should reach an internal temperature of 190°F (88°C) when fully baked.